Chocolate Wafers with Cream: An Irresistible Classic Dessert 😋🍫
There’s something undeniably comforting about the combination of crispy chocolate wafers and smooth cream. This dessert brings back nostalgic memories of childhood, where simple yet delicious treats made any day special. Chocolate wafers with cream strike the perfect balance between lightness and indulgence, making them an ideal choice for gatherings, weeknight treats, or a quiet evening indulgence.
In this comprehensive article, we’ll dive deep into the history of chocolate wafers, the science behind the perfect cream filling, step-by-step instructions, and creative variations to keep things exciting. So, grab a cup of coffee and let’s explore this delightful dessert! ☕️🍫
A Brief History of Chocolate Wafers 📜
The origin of chocolate wafers can be traced back to 19th-century Europe, where thin, crispy biscuits were a popular treat. Bakers experimented with cocoa to create a richer, more indulgent version, leading to the creation of chocolate wafers. Over time, the idea of layering these wafers with cream emerged, resulting in a simple yet luxurious dessert known for its light texture and balanced sweetness.
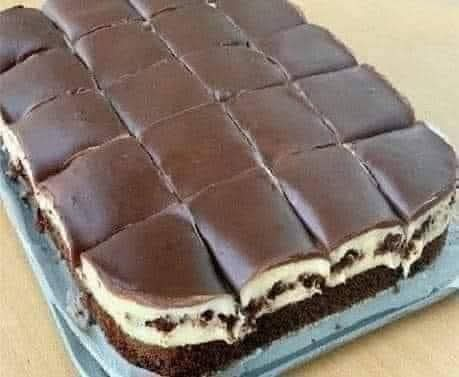
In the United States, this combination gained fame through the classic icebox cake—a no-bake dessert where layers of chocolate wafers softened by whipped cream transformed into cake-like slices after chilling. This no-fuss dessert quickly became a household favorite for its convenience and flavor.
Why Chocolate Wafers with Cream Are So Addictive 🤤
- Textural Harmony: The contrast of crisp wafers and velvety cream.
- Customizable: Endless options for flavors and toppings.
- No-Bake Convenience: Ideal for hot days or busy schedules.
- Make-Ahead Perfection: Tastes better after chilling overnight.
- Universal Appeal: Loved by both kids and adults alike.
Ingredients for Chocolate Wafers with Cream 🛒
For the Chocolate Wafers:
- 1 cup all-purpose flour
- ¼ cup unsweetened cocoa powder
- ½ cup granulated sugar
- ¼ tsp salt
- ½ tsp baking powder
- ¼ cup unsalted butter (cold, cubed)
- 3–4 tbsp milk (as needed)
Or save time with store-bought chocolate wafers.
For the Cream Filling:
- 1 cup heavy whipping cream
- ¼ cup powdered sugar
- 1 tsp vanilla extract
- 2 tbsp mascarpone or cream cheese (optional for richness)
Optional Add-Ins:
- Fresh berries (raspberries, strawberries)
- Chopped nuts (hazelnuts, almonds)
- Chocolate shavings or sprinkles
- Espresso powder for a mocha twist
The Science Behind Perfect Chocolate Wafers 🔬
The key to the ideal wafer is achieving a delicate crispness without becoming too dry. This is accomplished by:
- Cold Butter: Creates air pockets during baking for a light texture.
- Thin Dough: Rolling the dough to ⅛-inch thickness ensures a crispy bite.
- Cocoa Powder: Adds richness without excess moisture, crucial for crispness.
Proper chilling allows the wafers to absorb moisture from the cream, transforming them into cake-like layers. This process takes about 4–6 hours or, ideally, overnight.
Step-by-Step Recipe: Chocolate Wafers with Cream 🍫😋
1. Making the Wafers (Skip if using store-bought):
- Mix dry ingredients: In a bowl, sift together flour, cocoa powder, sugar, salt, and baking powder.
- Incorporate butter: Cut in cold butter until the mixture resembles coarse crumbs.
- Add milk: Gradually add milk, one tablespoon at a time, until the dough comes together.
- Roll and cut: Roll dough between parchment sheets to about ⅛-inch thickness. Use a round cutter for even shapes.
- Bake: Transfer to a lined baking sheet and bake at 350°F (180°C) for 8–10 minutes. Let cool completely.
2. Preparing the Cream Filling:
- Chill tools: Freeze mixing bowl and beaters for 10 minutes.
- Whip the cream: Beat heavy cream, powdered sugar, and vanilla at medium-high speed until stiff peaks form.
- Add mascarpone: Fold in mascarpone for a richer texture.
3. Assembling the Wafers with Cream:
- Layer: Spread a generous dollop of cream on a wafer and top with another wafer. Repeat to form stacks.
- Chill: Refrigerate for 4–6 hours or overnight for a soft, cake-like texture.